Table of Contents
- Step 1: Diagnose What Is Actually Wrong With Your Security Camera Footage
- Step 2: Fix Camera Placement, Field of View, and Coverage Gaps
- Step 3: Choose the Right Security Camera Resolution for the Job
- Step 4: Tune Motion Detection, Brightness, and Contrast Settings
- Step 5: Improve Security Camera Night Vision Quality
- Step 6: How to Enhance Blurry Security Camera Footage Without Breaking the Chain of Evidence
- Step 7: Security Camera Bandwidth Troubleshooting for Clearer Streams
- Step 8: Clean Lenses, Maintain Housings, and Protect Long-Term Image Quality
- Frequently Asked Questions
Last Updated: October 5, 2026
Step 1: Diagnose What Is Actually Wrong With Your Security Camera Footage
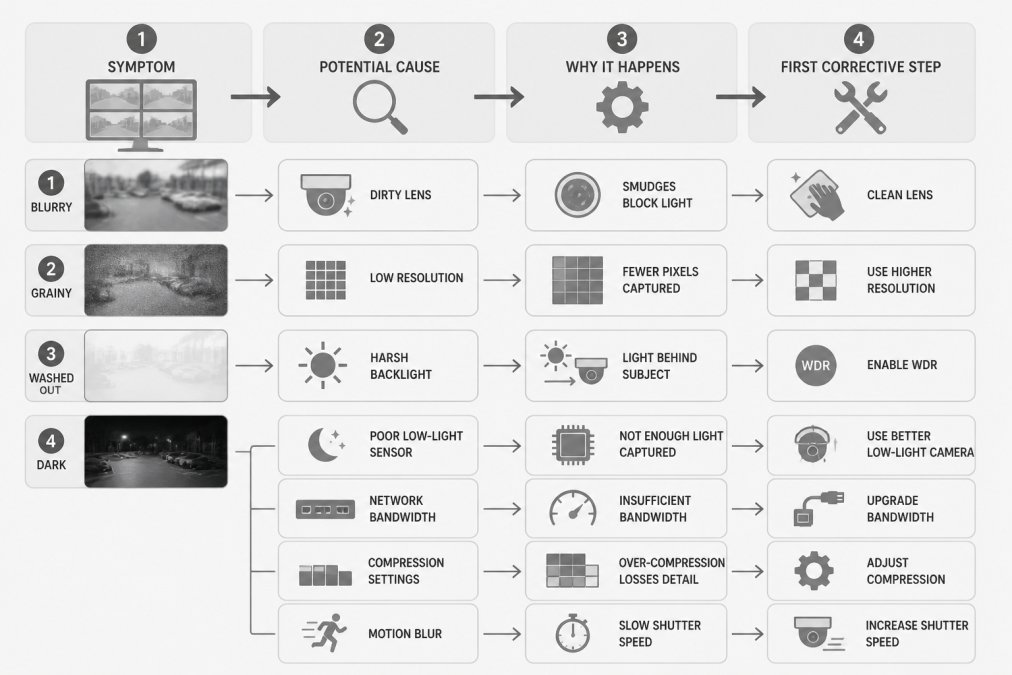
“Bad video” is not a diagnosis. Blurry, grainy, washed out, and dark are four different failures with four different fixes.
Most people jump straight to buying new cameras, usually the wrong move.
A common mistake is replacing hardware when the real issue is a dirty lens, a bad angle, or a network bottleneck. Our first step on any camera call is the same: watch the footage and describe exactly what looks wrong.
Common Symptoms and What They Usually Mean
| Symptom | Likely Cause | First Fix to Try |
|---|---|---|
| Blurry, soft edges | Dirty lens or smudged housing | Clean the lens |
| Grainy, noisy image | Low light or high compression | Adjust exposure, lower compression |
| Washed out, hazy | Glare, backlight, or sun flare | Reposition or add a hood |
| Dark at night | Weak IR or poor low-light sensor | Check IR LEDs, add lighting |
| Stuttering, freezing | Bandwidth or Wi-Fi issues | Check network load |
Start with the cheapest fix. Cleaning a lens costs nothing. A new camera does not.
Pull the last 24 hours of footage at the same time of day the problem happens. Most image issues are time-specific, and that pattern tells you more than any single clip.
Step 2: Fix Camera Placement, Field of View, and Coverage Gaps
Placement decides more about image quality than most settings ever will. A perfect camera in the wrong spot still gives you useless video, point it at the wrong zone and you get a beautiful shot of an empty hallway.
Walk your property and ask three questions:
- Does each camera cover the entry points that matter?
- Do the fields of view overlap enough to follow someone across the property?
- Are there blind spots between cameras?
Eliminating Blind Spots and Overlap Failures
Blind spots are gaps no camera sees; overlap is where two cameras cover the same ground, letting you track a person from frame to frame. Aim for 20 to 30 percent overlap between adjacent cameras, too little and you lose people between views, too much and you waste coverage.
Keep cameras angled slightly downward. Pointing them at the horizon catches sky, glare, and passing headlights instead of faces.
Step 3: Choose the Right Security Camera Resolution for the Job
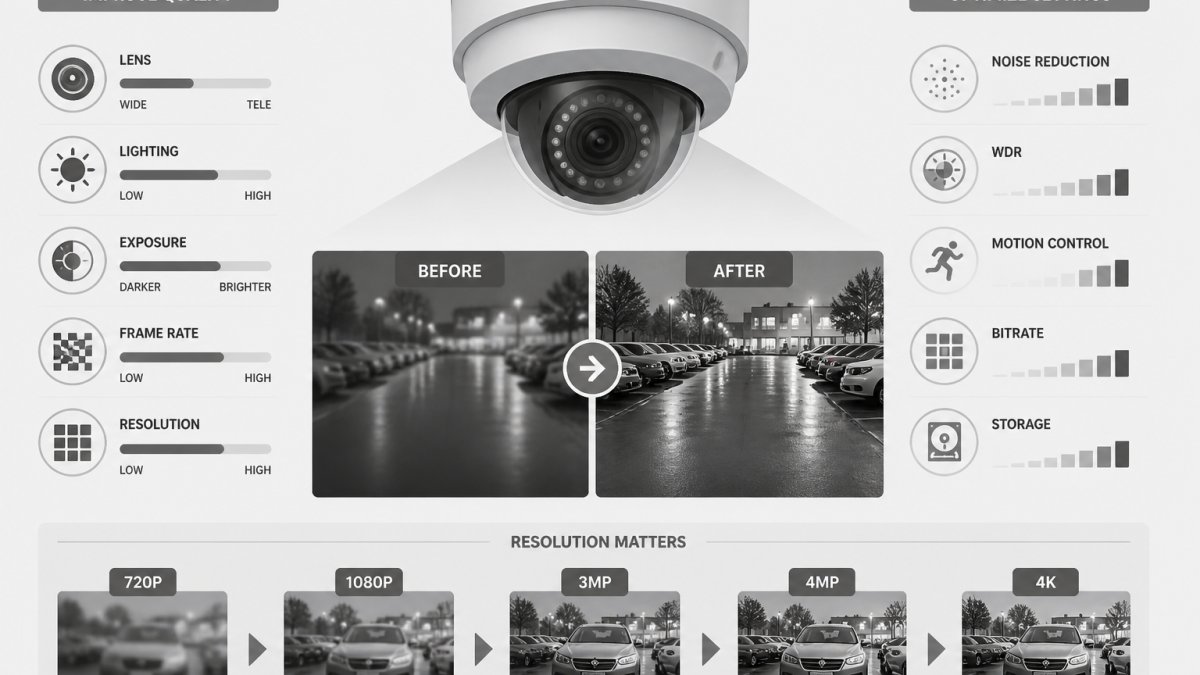
Security camera resolution is the number of pixels a camera captures, written as width by height, and it sets the ceiling on how much detail you can pull from a clip. But the number on the box is not what matters, how many pixels land on the subject does.
Think in Pixels Per Foot, Not Megapixels
A rule of thumb borrowed from forensic video work: you need roughly 40 pixels across a face for reliable identification, and about 80 pixels per foot of scene width to read a license plate. Below that, no amount of zooming or sharpening recovers a usable ID.
You can estimate your own pixel density before you buy anything:
- Measure the horizontal width of the area the camera will cover, in feet.
- Divide the camera’s horizontal resolution by that width.
- Compare the result to the thresholds above.
A 1080p camera (about 1,920 horizontal pixels) covering a 20-foot-wide doorway gives roughly 96 pixels per foot, plenty for a face.
Match Resolution to the Job
- 1080p (HD): wide overview shots, hallways, parking areas where you only need to see activity
- 4MP to 5MP: entrances and walkways where you need to identify faces at close range
- 4K (UHD): large lots, perimeters, and anywhere you need to zoom in later, but only if the lens and lighting can support it
A 4K camera with a cheap lens and weak low-light sensor looks worse at night than a well-placed 1080p unit. Resolution is one link in a chain that also includes lens quality, sensor size, bitrate, and lighting.
The Recorder and Storage Trade-Off
Higher resolution is not free. A 4K stream at a given frame rate and bitrate consumes roughly four times the storage of a 1080p stream at the same settings. If your recorder, hard drive, or network cannot keep up, you get dropped frames, shorter retention, or both, and a dropped frame is worse than a lower-resolution frame you kept.
Before you upgrade cameras, check three things:
- Recorder channel capacity: can it decode and record the new resolution on every channel at once?
- Storage math: multiply bitrate by seconds per day by retention days by camera count. If the result exceeds your drive, you will lose history.
- Network headroom: a 4K stream at a typical bitrate can push 6 to 8 Mbps per camera. Ten of those saturate a gigabit link faster than most people expect.
Buying higher resolution without upgrading your recorder, storage, or network leads to dropped frames and shorter retention. The camera outruns the system behind it.
The Unique Angle: Do the Math Before You Buy
Most buying guides say ‘match resolution to the job’ and stop. The step they skip is the arithmetic: run the pixels-per-foot calculation for each camera position, write the number down, and compare it to the 40-pixel face and 80-pixel plate thresholds. That exercise tells you more about whether you need a new camera than any spec sheet, and often shows that a cheaper camera aimed correctly beats an expensive one aimed at the horizon.
Step 4: Tune Motion Detection, Brightness, and Contrast Settings
Motion sensitivity set too high is one of the most common causes of unusable footage.
Turn sensitivity down and use motion zones instead. Draw a zone around the door or gate you care about.
Then adjust the image: brightness controls how light or dark the picture looks, contrast the difference between light and dark areas.
- Lower brightness if faces look washed out
- Raise contrast if the image looks flat and gray
- Use backlight compensation when a bright window or doorway blows out the subject
Make one change at a time. Check the result at the same time of day. Small tweaks beat big swings.
Step 5: Improve Security Camera Night Vision Quality
Security camera night vision quality depends on three things: the low-light sensor, the infrared LEDs, and existing on-site light.
When night footage looks bad, check these first:
- IR reflection: a nearby wall, eave, or spider web bounces IR light back into the lens
- Range: IR LEDs have a limit; anything past it goes dark
- Ambient light: a porch light or parking lot lamp often does more than the camera’s own IR
Move the camera away from reflective surfaces. Clean the housing. Add a motion light where it makes sense.
A low-light sensor matters more than megapixels after dark. A camera with a larger sensor and fewer pixels often beats a 4K unit at night.
Step 6: How to Enhance Blurry Security Camera Footage Without Breaking the Chain of Evidence
You can enhance blurry security camera footage, but there are hard limits. Software can sharpen edges, brighten shadows, reduce noise, and stabilize a shaky frame, but it cannot invent detail that was never captured. Understanding that line separates a useful clip from a misleading one.
What Enhancement Can and Cannot Recover
What it can usually improve:
- Contrast and brightness: lifting a dark clip so a face or plate becomes visible
- Noise reduction: smoothing grain from a high-ISO night shot so shapes are easier to read
- Sharpening: making existing edges crisper, up to a point
What it cannot do:
- Resolve a face that was never captured at enough pixels. If a subject is 15 pixels wide in the original, no filter will turn that into a recognizable face. This is the single most common misunderstanding in the field.
- Read a license plate that is blurred beyond the plate’s character height. Plate readers need roughly 20 pixels of height per character to work reliably.
- Recover detail lost to compression. Once a codec has thrown away a block of pixels, that information is gone.
A useful mental model: enhancement is a presentation tool, not a recovery tool. It helps a human see what is already there. It does not add facts.
Preserve the Original Before You Touch Anything
If footage may be used in an investigation, an insurance claim, or a legal matter, the original file is the evidence and the enhanced version is a derivative. Treat them differently:
- Copy the original before you edit anything, and work only on the copy
- Log every change, the software used, and the timestamp
- Keep the original in its native format on its original storage
A common pattern is that the enhanced clip gets shared widely while the original is overwritten or lost, and when authenticity is questioned, there is nothing to compare against. Preserve the original first, every time.
When to Bring in a Professional
For anything that may go to law enforcement or court, talk to your provider before you process it. The National Institute of Standards and Technology guidance on digital evidence covers how digital evidence should be handled and preserved, and it is a reasonable starting point for understanding what a defensible workflow looks like. A forensic video examiner can also apply techniques, frame averaging, photogrammetry, side-by-side comparison, that go beyond what consumer software offers, and can document the process in a way that holds up to scrutiny.
Enhancement improves how footage looks to a human. It does not add facts. Preserve the original or you may lose the clip’s value entirely, and know the pixel-density limits before you promise anyone an identification.
Step 7: Security Camera Bandwidth Troubleshooting for Clearer Streams
Security camera bandwidth troubleshooting starts with one question: is the network keeping up? Every camera sends data constantly, and as you add cameras the load climbs. If your network or recorder cannot handle it, you get stuttering, dropped frames, and pixelated video even from a good camera.
Check these in order:
- Wi-Fi signal: weak signal causes packet loss and stutter. Wired cameras avoid this entirely.
- Network load: peak hours on a busy office network can starve the cameras.
- Compression settings: higher compression shrinks files but throws away detail.
If your cameras run on Wi-Fi and the footage stutters at busy times of day, that pattern points straight at bandwidth. A structured cabling upgrade often fixes it for good.
Step 8: Clean Lenses, Maintain Housings, and Protect Long-Term Image Quality
Maintenance is the cheapest image upgrade there is. A dirty lens or fogged housing degrades footage daily, and most people never check.
Build a simple routine:
- Wipe lenses with a microfiber cloth and lens-safe cleaner monthly
- Clear spider webs and debris from around the housing
- Check seals and gaskets for cracks that let in moisture
Spider webs are the number one cause of mystery IR glare, they catch infrared light and bounce it back into the lens. If cameras sit near trees, dust, or coastal air, clean them more often; salt and pollen build up fast.
When the image still is not good enough after all of this, the honest answer may be an upgrade. That is where a camera system assessment from Advanced Commercial Communications helps. Our security camera systems service covers design, installation, and support, and our team offers free site walks so you can see the plan before you commit.
Frequently Asked Questions
How do I enhance blurry security camera footage?
Start by identifying the cause. Clean the lens with a microfiber cloth, check the focus ring if your camera has one, and confirm the resolution is set to its highest available setting. If the blur is from motion, raise the shutter speed or increase motion detection sensitivity. For footage already recorded, use enhancement software sparingly to sharpen edges, but understand that digital enhancement cannot recover detail that was never captured. If the original clip lacks identifying detail, no filter will create it.
Is 1080p enough for an outdoor security camera?
1080p works for wide-area coverage where you only need to see movement, but it struggles to capture license plates or facial features at distance. For identifying someone at 20 feet or more, 4K (8MP) gives you roughly four times the pixels. Many small businesses run a mix: 1080p for hallways and 4K for entrances, parking lots, and cash-handling areas. Bandwidth and storage costs rise with resolution, so match the camera to the job rather than upgrading everything at once.
Why does my security camera footage look grainy at night?
Grain at night usually comes from high ISO gain. When ambient light drops, the camera boosts sensitivity, which amplifies noise. Fixes include adding a motion-activated white light near the camera, lowering the in-camera sharpness setting (which amplifies noise), and ensuring IR LEDs are not reflecting off a nearby wall or eave. If your camera has a low-light sensor, check that it is enabled. In very dark areas, a camera with a larger image sensor and true WDR will outperform a cheaper unit with more IR LEDs.
Can a slow network connection reduce security camera video quality?
Yes. If your network cannot sustain the camera’s bitrate, the system may drop frames, lower resolution dynamically, or introduce compression artifacts. Run a bandwidth test on the camera’s VLAN during peak hours. If utilization exceeds 70 percent, separate cameras onto their own VLAN or upgrade to a PoE switch with higher throughput. Wi-Fi cameras are especially sensitive; a weak signal causes the camera to reduce quality to maintain connection. Wired Ethernet is always the more reliable choice for critical views.
Most camera complaints trace back to placement, lighting, or network, not the camera itself. Fixing those takes less money than most people expect. If your footage still falls short after tuning, Advanced Commercial Communications can help. We offer free site walks, custom camera system design, structured cabling, and managed IT support, all built around your budget and your facility. Talk to an expert and get footage you can actually use.